Author Topic: Brammo Tail Tidy Mod Install  (Read 3584 times)

7racer

  • Brammovangelist
  • *****
  • Posts: 322
    • View Profile
    • Email
Brammo Tail Tidy Mod Install
« on: March 09, 2013, 02:31:23 PM »
Pretty simple DIY install:

Time: <1hr
Difficulty:  Easy
Tools: H5 allen?  8mm socket

Pretty easy install.  Just a couple things.  I would take the seat off first.  The wiring connectors are closer to the bike side vs the light side of the long tail.  I took it off from the tail side first hoping the connectors would be there to pull the wires thru the tunnel of the long tail.

Anyways, here is the install:


Before:


After:


« Last Edit: March 09, 2013, 02:41:40 PM by 7racer »

7racer

  • Brammovangelist
  • *****
  • Posts: 322
    • View Profile
    • Email
Re: Brammo Tail Tidy Mod Install
« Reply #1 on: March 09, 2013, 02:39:25 PM »
I would remove the seat first.

In the picture here it's the center bolt with the arrow.  H5? I think Allen.

Lift seat up and place to the side.


Next unbolt the long tail removing the other H5 allens in the above picture.  They seem to have a lock tight on them so need a little umph, but they are short bolts.


7racer

  • Brammovangelist
  • *****
  • Posts: 322
    • View Profile
    • Email
Re: Brammo Tail Tidy Mod Install
« Reply #2 on: March 09, 2013, 02:44:52 PM »
Next expose the wire connectors.

(the long tail will be dangling, I put a towel over the rear CF fender to keep it from scratching anything up)

There should be two that are keyed for the center light.  They are different so no worries confusing which one is which.

Then there are the 2 sets of turn single lights.  Just keep these straight because if you hook them up backwards you actuate the wrong light!  I just marked one of the grounds with a piece of blue painters tape on both ends. 
The turn signal wiring just pulls out.


« Last Edit: March 09, 2013, 02:57:40 PM by 7racer »

7racer

  • Brammovangelist
  • *****
  • Posts: 322
    • View Profile
    • Email
Re: Brammo Tail Tidy Mod Install
« Reply #3 on: March 09, 2013, 02:47:13 PM »
Once you do that the long tail and the rear light should be free.

Remove the long H5 bolts up top.
And the two 8mm locking nut below (note you need an allen on the other side to keep these from spinning).


As you can see from the below picture, the two upper bolts are LONG and the metal spacer fits between the light and metal bracket.


« Last Edit: March 09, 2013, 02:48:47 PM by 7racer »

7racer

  • Brammovangelist
  • *****
  • Posts: 322
    • View Profile
    • Email
Re: Brammo Tail Tidy Mod Install
« Reply #4 on: March 09, 2013, 02:52:24 PM »
That should be it.  The long tail should be off and look like this.
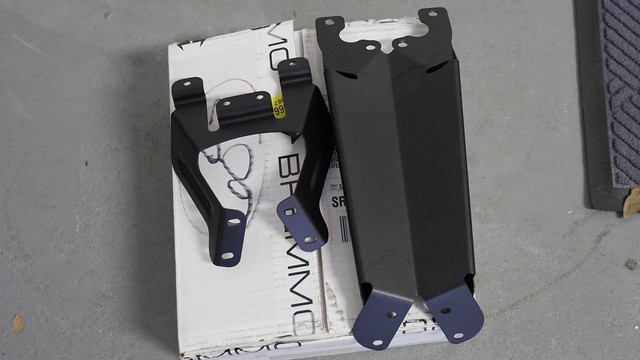


Now just reassemble.  The spacers above are a bit of a PITA to fit.  What I did was to put the bolt threw the tail tidy, put the space on (both sides), then align the rear tail light and tighten. 

Finally with everything tightened and together, pull the excess wiring threw the hole that you exposed by removing the seat (this is why you want the seat removed).  Make sure there isn't any areas that the wires can pinch and reinstall the seat.

Underneath the new tail tidy, I just zip tied the wires lightly together to keep everything neat.

That's it!

« Last Edit: March 09, 2013, 02:55:34 PM by 7racer »

implovator

  • Empulse Guru
  • ****
  • Posts: 190
    • View Profile
Re: Brammo Tail Tidy Mod Install
« Reply #5 on: March 09, 2013, 07:38:01 PM »
Awesome write-up! Thanks a bunch for that. Initially I was on the fence about spending cash on cosmetic upgrades, but that's HOT!

Brammofan

  • Administrator
  • Brammovangelist
  • *****
  • Posts: 3249
  • Following the momentum of Enertia
    • View Profile
    • Email
Re: Brammo Tail Tidy Mod Install
« Reply #6 on: March 09, 2013, 09:54:05 PM »
That was great. So clear, even I could follow the directions. And great photos of the before, after, and the process.
The Brammoforum Wiki is still active: http://www.brammoforum.com/wiki

Ain

  • Enertia Master
  • ***
  • Posts: 41
    • View Profile
Re: Brammo Tail Tidy Mod Install
« Reply #7 on: March 11, 2013, 12:02:50 AM »
Looks awesome!  So...was this just a "sample" part they sold you, or are they taking orders for these yet?
2013 Empulse R  (Delivered 12/7/12)
2009 BMW K1300S
2002 MV Agusta F4 Senna

7racer

  • Brammovangelist
  • *****
  • Posts: 322
    • View Profile
    • Email
Brammo Tail Tidy Mod Install
« Reply #8 on: March 11, 2013, 12:06:17 PM »
Not sure.  It really isn't a difficult piece but it didn't come in any fancy brammo packaging so it could have been a proto or come off of a trial bike. 

But I did hear that they were getting this all set in place.  Brammobrian got me in contact with Adrian who took the order for my parts.  I'll email him a bit later and ask if its ok to post his email so you can get in contact with him.  Otherwise, if you want I can pm it to you so you can get your order placed!!

I love the look of the tidy!  Now I would love to minimize that license plate frame!!!

FrankH

  • Empulse Guru
  • ****
  • Posts: 142
  • First Enertia+ in the Netherlands!
    • View Profile
Re: Brammo Tail Tidy Mod Install
« Reply #9 on: March 11, 2013, 03:49:38 PM »
I love the look of the tidy!  Now I would love to minimize that license plate frame!!!

It does look a lot better. On some earlier pics of the mod, I couldn't really tell the improvement but these pictures are convincing!
The Enertia (and Plus) could benefit from something like that too I think. I already chopped the excess metal off the licence plate frame but that backside extends way too long and you can't use it for carrying something. Not for anything else either.

7racer

  • Brammovangelist
  • *****
  • Posts: 322
    • View Profile
    • Email
Re: Brammo Tail Tidy Mod Install
« Reply #10 on: March 11, 2013, 04:56:12 PM »
I love the look of the tidy!  Now I would love to minimize that license plate frame!!!

It does look a lot better. On some earlier pics of the mod, I couldn't really tell the improvement but these pictures are convincing!
The Enertia (and Plus) could benefit from something like that too I think. I already chopped the excess metal off the licence plate frame but that backside extends way too long and you can't use it for carrying something. Not for anything else either.

wooo how did you drop the excess off the license plate frame?


7racer

  • Brammovangelist
  • *****
  • Posts: 322
    • View Profile
    • Email
Re: Brammo Tail Tidy Mod Install
« Reply #11 on: March 11, 2013, 04:56:58 PM »
Adrian got back to me.

To order the tail tidy best to email:
empulse@brammo.com

it goes to a small group that can handle the orders.

FrankH

  • Empulse Guru
  • ****
  • Posts: 142
  • First Enertia+ in the Netherlands!
    • View Profile
Re: Brammo Tail Tidy Mod Install
« Reply #12 on: March 12, 2013, 03:01:28 PM »
wooo how did you drop the excess off the license plate frame?

see http://brammoforum.com/index.php?topic=1778.msg13471#msg13471

But it looks like the Empulse's licence plate holder is a lot smaller already.

ttxgpfan

  • Brammovangelist
  • *****
  • Posts: 449
    • View Profile
    • Email
Re: Brammo Tail Tidy Mod Install
« Reply #13 on: March 25, 2013, 08:45:23 PM »
Nice kit!  But now that I look at the rear hugger I realize it does need to be much longer.

Gavin

  • Brammovangelist
  • *****
  • Posts: 2652
    • View Profile
    • Sol Power.  BrammoBlog
Re: Brammo Tail Tidy Mod Install
« Reply #14 on: April 03, 2013, 08:59:49 PM »
Thanks so much for the amazing guide.

Tail tidy installed in less than 45 minutes. No glitches. No problems. No cursing nor need for bandages. And I am mildly mechanically challenged.

Photos later in daylight :)

Gavin