Author Topic: Apex Clip-ons installation  (Read 4974 times)

7racer

  • Brammovangelist
  • *****
  • Posts: 322
    • View Profile
    • Email
Apex Clip-ons installation
« on: March 30, 2013, 09:21:05 PM »
Yikes!  What did I get myself into!  So I ended up getting some clip ons for looks and a bit better riding position.

To cut to the chase, at speed the lower position is MUCH more comfortable with less wind resistance.  Definitely not as upright.  Also there is more pressure on your hands and wrist unless you use more of your core to support your weight.  All and all not too bad riding position wise.

Second, I ended up going with apex for their clip ons.
http://www.apexmfg.com/products/apex-clip-ons/product/view/11/176

I got the GP ones which are nice as you don't have to take off the triple tree and the bar is adjustable.  As you can see from the link, there is a pin and locking screw.  You remove the screw and can rotate the bar from 9, 4.5 to 0 degree angles.  Also, there is a couple bolts that hold the headlamp in place that I was worried about clearance issue  for other bars like the Speedymoto one mentioned in the clip-on thread.  The speedymoto might have still fit too.
But like the Speedymoto, I liked the Apex as it gives you some adjustability.
http://brammoforum.com/index.php?topic=1894.15


So here is what the bar looks like...super simple.


Set screw to hold the bar in place.  The only downside for this is you have to remove the bolts and undo half the clip on if you want to adjust the bar angle after you mount it.


Here is the locking pin and you can see the bar out of the joint.

« Last Edit: March 30, 2013, 09:55:59 PM by 7racer »

7racer

  • Brammovangelist
  • *****
  • Posts: 322
    • View Profile
    • Email
Re: Apex Clip-ons installation
« Reply #1 on: March 30, 2013, 09:36:56 PM »
Tools: 
Sorry don't remember exactly but
20,25,10,6,5,4 hexs
some Torx screws (don't remember size, used 3 of them)
philips screw driver
Silicon spray
dremel

Time 4-6 hours. going slow
Difficulty: It's actually pretty easy, but I will give it a moderate

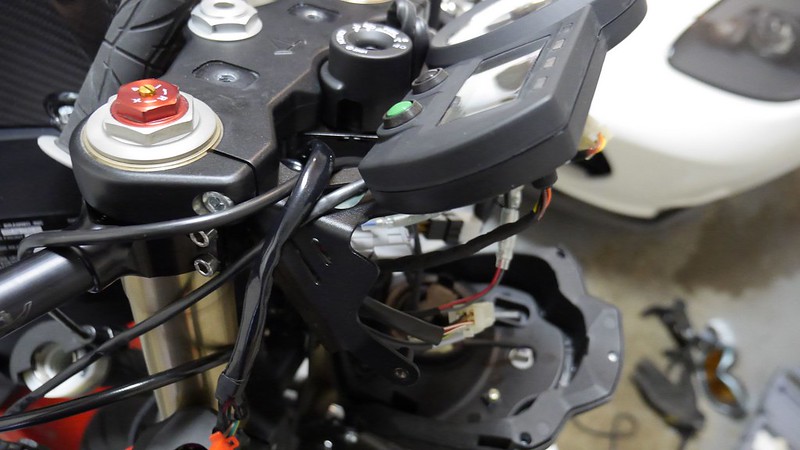
First you remove the current hardware.  Pretty straight forward.  Just remember what it looks like before and start unscrewing the allens and philips first.  I started on the throttle side which was super easy.  Allen to remove the throttle, philips to remove the start/power off button, and allens to remove the front brake.  Also something to cut the zip ties holding the wiring (I have these end cutters that work great for this).

Removing the clutch side, you need a screwdriver or I used a straighten hanger I had laying around to lift up the grip and spray some silicon spray in it.  I remove the light/horn switch and then the clutch lever.  This let me get at the grip from the other side to spray more lub in and remove the grip.

Last thing to remove is the handle bars which is super straight forward.  What you get left is this.


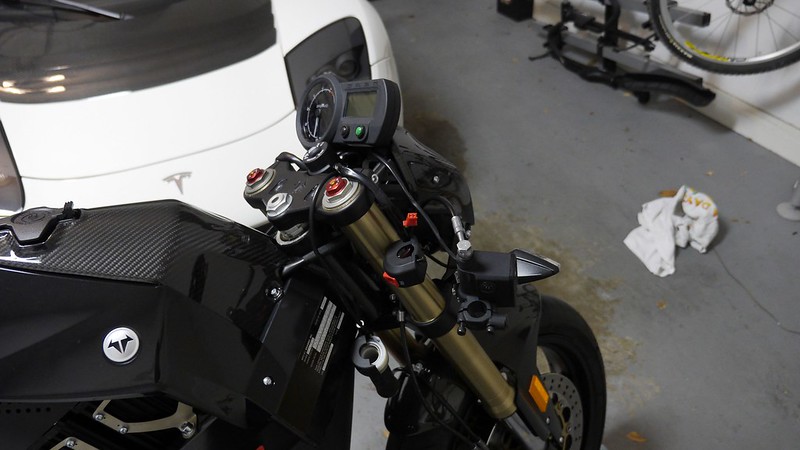
I set the clips and bars in at basically a "zero" degree angle with some rake.  When you put the clip on it just clears the bracket for the headlight and the bolts underneath that hold the headlight to the triple tree.  The only thing that bothered me was that the wiring went OVER the headlight bracket.

here is a pic of the bars at zero test fitted with the bolts loosely in place.


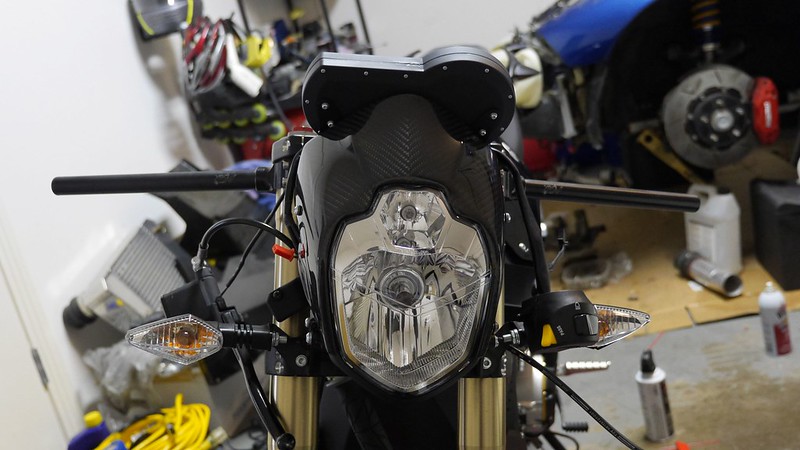
So you can see from the picture the wiring going over the bracket.  Well how the hell am I going to route the wires lower?  Super easy.  I just remove the lower allens holding the head light assembly and the allens that hold the CF mold.  The top of the headlight pops out and you can move it out of the way.  That then gives you access to the gauge cluster you see here.  Just use the torx screws and remove the cluster.  Now just move the wires below the headlight bracket and reattach the gauge cluster and head light.


« Last Edit: March 30, 2013, 10:09:18 PM by 7racer »

7racer

  • Brammovangelist
  • *****
  • Posts: 322
    • View Profile
    • Email
Re: Apex Clip-ons installation
« Reply #2 on: March 30, 2013, 09:39:44 PM »
Now when you remove the hardware from the stock handle bars you will notice there are 3 positioning pins you will need to file down with a dremel.  There are two on the throttle side, one on the clutch side.  The two plastic pieces are super easy to dremel.  Fortunately, the one metal piece is aluminum.  The dremel made short work of that too.


« Last Edit: March 30, 2013, 09:45:03 PM by 7racer »

7racer

  • Brammovangelist
  • *****
  • Posts: 322
    • View Profile
    • Email
Re: Apex Clip-ons installation
« Reply #3 on: March 30, 2013, 09:50:21 PM »
I have a small torque wrench.  In the instructions it tells you to torque to 6ft/lbs first (I cross tightened), then increase to 7, 7.5, then 8.  Once all was tightened.  I positions the clutch and brake levers where they were comfortable as well as the other controls.  I found that the 90 degree hooked fitting of the hydraulic lines for both the brake and clutch just clear the clip ons if you rotate them down a bit.  This also ended up being at a perfect and natural angle for my wrists.

So buttoned everything up.  Tripled check that there was no sticking of the throttle and the brake and clutch worked unencumbered.

Here is what it looks like now.


« Last Edit: March 30, 2013, 10:02:20 PM by 7racer »

7racer

  • Brammovangelist
  • *****
  • Posts: 322
    • View Profile
    • Email
Re: Apex Clip-ons installation
« Reply #4 on: March 30, 2013, 09:52:22 PM »
Outside shots:


and hey look at that!  there is a brammo logo there once you get the handlebars outta the way! :)


Brammofan

  • Administrator
  • Brammovangelist
  • *****
  • Posts: 3249
  • Following the momentum of Enertia
    • View Profile
    • Email
Re: Apex Clip-ons installation
« Reply #5 on: March 30, 2013, 10:30:18 PM »
Another excellent guide. Thank you so much!
The Brammoforum Wiki is still active: http://www.brammoforum.com/wiki

protomech

  • Brammovangelist
  • *****
  • Posts: 1987
    • View Profile
    • ProtoBlog
Re: Apex Clip-ons installation
« Reply #6 on: March 31, 2013, 02:34:10 AM »
Love it.
1999 Honda VFR800i | 2014 Zero SR
Check out who's near you on frodus's EV owner map!
http://protomech.wordpress.com/

Virtually Yours

  • Brammoholic
  • Brammovangelist
  • *****
  • Posts: 277
    • View Profile
Re: Apex Clip-ons installation
« Reply #7 on: March 31, 2013, 07:22:33 AM »
Wow! The clip ons and the tidy tail really add a new sporty look for the bike! How does the clip ons affect your slow speed maneuvers, if at all?
Actually Mine,
#42
Empluse R

implovator

  • Empulse Guru
  • ****
  • Posts: 190
    • View Profile
Re: Apex Clip-ons installation
« Reply #8 on: March 31, 2013, 10:24:46 AM »
Nice work!

Have you experimented with width any yet? I think a lot of people start wide and then slowly bring them back more. Shelina was actually talking about this...I think in an interview with TTXGPFan. I think Eric talked her into bringing them in more and she loved it. For me, it helps me keep my elbows in with the up elbow draped on the tank and the down elbow folded into the body more. I had a bad habit of supporting my weight with the down arm, but folding your elbow in prevents that, ensuring that you're hanging off proper with lighter input on the bars.

BrammoBrian

  • Obsessive Empulsive
  • Brammovangelist
  • *****
  • Posts: 590
  • Director of Product Development - Brammo, Inc.
    • View Profile
    • BRAMMO
    • Email
Re: Apex Clip-ons installation
« Reply #9 on: March 31, 2013, 04:09:28 PM »
Wow!  Looks great and I love the adjustability. I'd be curious to know if dropping the angle of the bar downward from straight would help alleviate some of the pressure on your wrist.  Certainly gives the bike a more "cafe racer" character.  Rad.

7racer

  • Brammovangelist
  • *****
  • Posts: 322
    • View Profile
    • Email
Re: Apex Clip-ons installation
« Reply #10 on: March 31, 2013, 04:35:17 PM »
Wow! The clip ons and the tidy tail really add a new sporty look for the bike! How does the clip ons affect your slow speed maneuvers, if at all?

I'm not sure as I haven't done any slow speed maneuvers.  But there is plenty of clearance from the bars to the "tank" so I think you can turn lock to lock without an issue.  The weather finally let up today and will see if I can take it for a spin again.

7racer

  • Brammovangelist
  • *****
  • Posts: 322
    • View Profile
    • Email
Re: Apex Clip-ons installation
« Reply #11 on: March 31, 2013, 04:39:01 PM »
Nice work!

Have you experimented with width any yet? I think a lot of people start wide and then slowly bring them back more. Shelina was actually talking about this...I think in an interview with TTXGPFan. I think Eric talked her into bringing them in more and she loved it. For me, it helps me keep my elbows in with the up elbow draped on the tank and the down elbow folded into the body more. I had a bad habit of supporting my weight with the down arm, but folding your elbow in prevents that, ensuring that you're hanging off proper with lighter input on the bars.

hmmm not yet.  But I don't think I can get shorter bars with the current set up.  If you look at the 90 degree fitting on the brake and clutch and whatever that black box is on both, it keeps you from moving the grips and electronics more inboard.  If there is a way to move those let me know!  I'll give it a try!

7racer

  • Brammovangelist
  • *****
  • Posts: 322
    • View Profile
    • Email
Re: Apex Clip-ons installation
« Reply #12 on: March 31, 2013, 04:43:41 PM »
Wow!  Looks great and I love the adjustability. I'd be curious to know if dropping the angle of the bar downward from straight would help alleviate some of the pressure on your wrist.  Certainly gives the bike a more "cafe racer" character.  Rad.

thanks Brian!  About dropping the angle, that was one of the reasons that I pre-ordered the original Empulse prototype.  I loved the cafe racer look!

I don't ride a long way and really didn't have any pressure on the wrist.  Just that it was more noticeable than the positioning on the stock bars.

Also, I have short arms.  I wear a 32/33 shirt.  I was kinda afraid if I used a lower angle that I would be reaching too far!  With that being said, since these are pretty easy to adjust I might give it a month and try to drop it lower.

ttxgpfan

  • Brammovangelist
  • *****
  • Posts: 449
    • View Profile
    • Email
Re: Apex Clip-ons installation
« Reply #13 on: March 31, 2013, 07:33:27 PM »
Did Brian just say "rad"?  :o

Sweet mod.  It looks awesome, and the write up really good too.

implovator

  • Empulse Guru
  • ****
  • Posts: 190
    • View Profile
Re: Apex Clip-ons installation
« Reply #14 on: March 31, 2013, 09:17:06 PM »
hmmm not yet.  But I don't think I can get shorter bars with the current set up.  If you look at the 90 degree fitting on the brake and clutch and whatever that black box is on both, it keeps you from moving the grips and electronics more inboard.  If there is a way to move those let me know!  I'll give it a try!

Oops. I should have said sweep. Be bringing them rearward you can narrow them. The way that set of clip-ons allows adjusting the angle is pretty rad (word of the day?). Between the two adjustments you have a lot that you can play with.