Author Topic: Powerlet Install  (Read 3130 times)

Ain

  • Enertia Master
  • ***
  • Posts: 41
    • View Profile
Powerlet Install
« on: January 20, 2013, 01:35:13 AM »
I finally found the time to complete my Powerlet install in order to hook up my electric vest on the Empulse.  Here's a quick post in case anyone else is looking to do the same.

Parts:
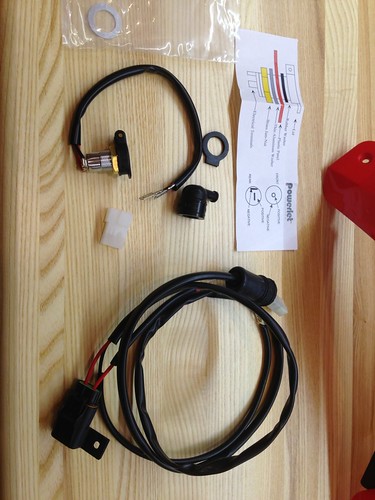
- Low profile 36" Powerlet wiring kit (http://www.powerlet.com/product/low-profile-powerlet-socket-kit-36/166)
- Molex pin/connectors (part #'s - 03-06-7023 & 02-06-6102 - ordered from http://www.mouser.com)

Tools:
- T-25 Torx screwdriver
- Hex key wrench set
- Wire cutter/stripper

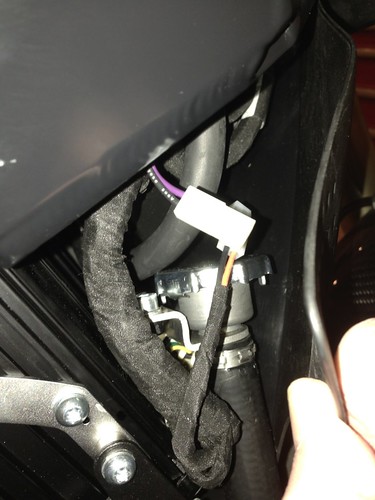
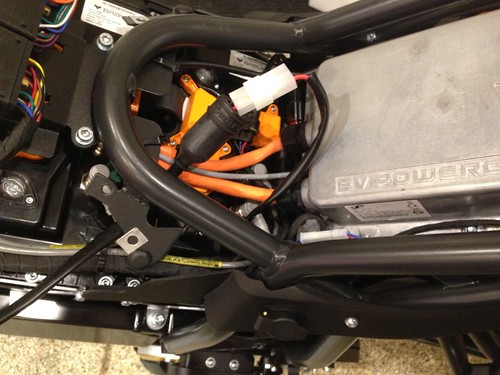
I stripped the bodywork and did a check to see if I could connect off of the 12V fuse block.  I was advised by Brammo to just use the accessory connector, but I figured I'd check anyway.  ;)  After taking a look, it wasn't going to be as simple as connecting the leads to screws, so I figured I'd stick with Brammo's advice and install the Molex plug and use the accessory connector.


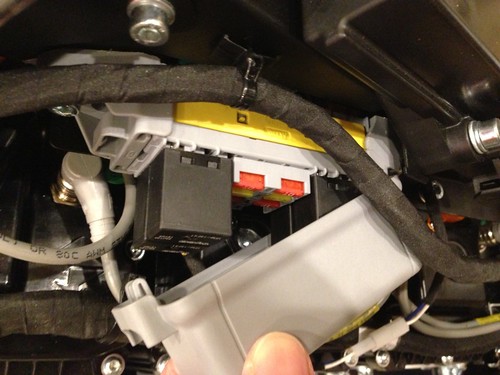
There are TWO Molex connectors under the right side panel - you want the purple/black one.  I checked with a multimeter and it's switched and the purple lead is the positive wire.


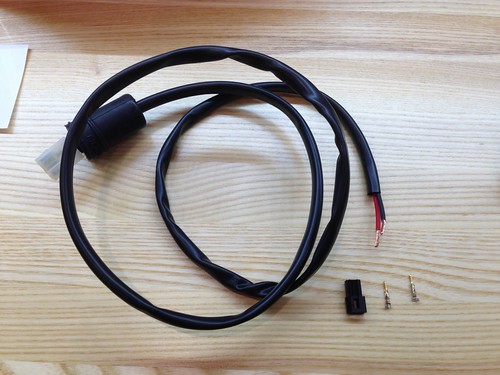
Here's the Powerlet kit.  I cut the leads on the 36" wiring harness and replaced it with the Molex connector.
NOTE:  The wires on the Powerlet harness are a bit thick for the Molex connector - you can't crimp the pins and include the insulation (had to just crimp on the wire).  It's also a tight fit to wedge the wire, plus insulation into the back of the plug.  I was able to assemble the connector and used electrical tape for reinforcement, but you could also spice in some thinner wire to make assembling the Molex connector easier.


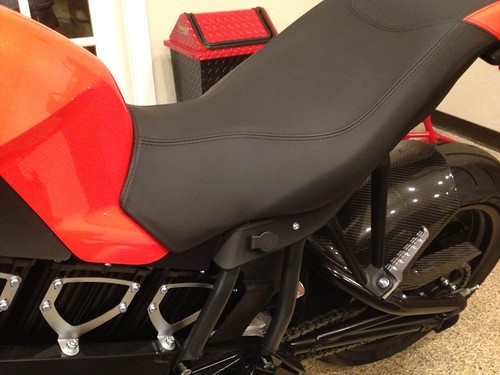
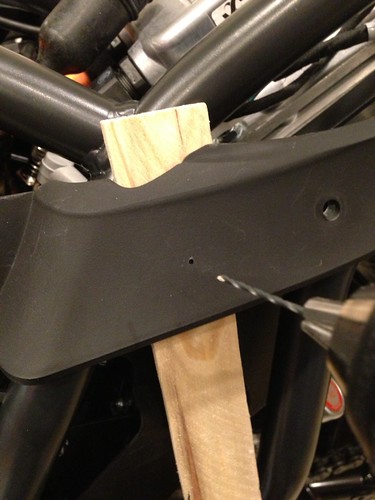
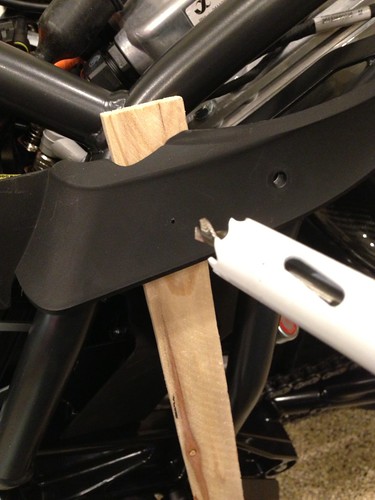
Now the scary part...  Drilling a new bike!  Powerlet hole saw (basically an 11/16") and  I used wood for a backstop to protect the frame.


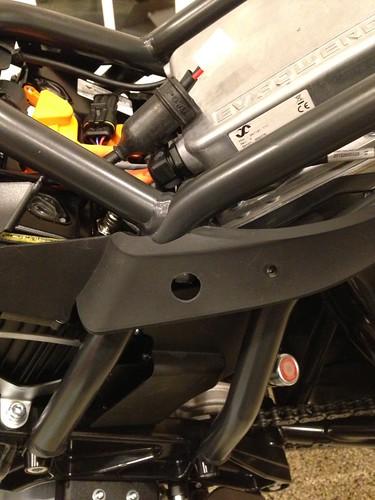
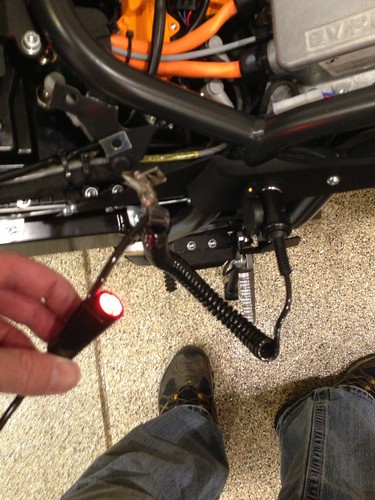
It's a bit of a tight fit on the left side (a bit less wiring on the right, but the two electric vests I've owned have always had left-hand connectors).  I ran the harness wires from the accessory connector under the "tank", and connected the socket wire to the harness under the seat.


Vest powered up fine, and it looks great with everything re-assembled!


2013 Empulse R  (Delivered 12/7/12)
2009 BMW K1300S
2002 MV Agusta F4 Senna

Deadly Silent Ninja

  • Brammovangelist
  • *****
  • Posts: 242
    • View Profile
Re: Powerlet Install
« Reply #1 on: January 20, 2013, 02:42:14 PM »
That really looks great! Very practical and useful.

Shinysideup

  • Brammovangelist
  • *****
  • Posts: 1423
    • View Profile
Re: Powerlet Install
« Reply #2 on: January 20, 2013, 04:02:09 PM »
Looking good! Thanks for all the pics and steps.

Is there enough room behind those panels below the seat that you could install a permanent heat controller? IIRC, they don't take up a lot of depth.

I put one on my BMW here:

http://www.flickr.com/photos/10852133@N02/2390055495/#in/set-72157601652381698/

Ain

  • Enertia Master
  • ***
  • Posts: 41
    • View Profile
Re: Powerlet Install
« Reply #3 on: January 20, 2013, 08:35:53 PM »
Is there enough room behind those panels below the seat that you could install a permanent heat controller? IIRC, they don't take up a lot of depth.

I think so - take a look at my third from last photo.  You could probably slip it in-between the frame rail and the EV charger (there's a bit of a gap on that side).

I couldn't tell from your photo, but is the knob for the heat controller remote, or do you need to mount the controller directly behind a plastic panel?
2013 Empulse R  (Delivered 12/7/12)
2009 BMW K1300S
2002 MV Agusta F4 Senna

Shinysideup

  • Brammovangelist
  • *****
  • Posts: 1423
    • View Profile
Re: Powerlet Install
« Reply #4 on: January 21, 2013, 01:07:16 AM »
The knob is for a panel-mount heat controller. The shaft of the knob ends in a small circuit board.  As I looked at your photo again, I realized that if the receptacle for the Powerlet plug fits behind there, then certainly the controller would.

Click this image to enlarge and you can see the size of the controller:

http://www.jpcycles.com/product/307-974
« Last Edit: January 21, 2013, 01:17:21 AM by Shinysideup »

EmpulseRider

  • Brammovangelist
  • *****
  • Posts: 893
    • View Profile
    • Email
Re: Powerlet Install
« Reply #5 on: January 21, 2013, 12:41:29 PM »
Very nicely done Ain... looks completely stock. Thanks for the detailed how-to!

implovator

  • Empulse Guru
  • ****
  • Posts: 190
    • View Profile
Re: Powerlet Install
« Reply #6 on: January 21, 2013, 04:49:43 PM »
Nice install, Ain! Thanks a bunch for the write-up. This will be definitely be my first of only a few mods. That's a great place to mount it.

I just added some heated gear this season with the idea that I'd be riding the GS and the Empulse soon. I ended up getting the Sedici Hot Wired stuff from Cycle Gear. I like Cycle Gear a lot, but I'm always highly suspicious of their product. I thought I'd mention it, because it's pretty versatile albeit with the sacrifice of a little usability.

Firstly, the jacket liner includes a free controller included with the really low $150 purchase price. The controller is unfortunately best mounted inside the jacket liner for reasons that become clear later. This means that it's a pain to adjust it while you're on the bike. Secondly the controller is not solid state and so you need to turn it on and adjust it every time you connect power.

Secondly, the jacket liner uses nanowires that are very similar, if not the same, as Gerbing. The construction looks pretty good so far. The panels in the front and the arms feel nice and even. The panel in the neck is perfect. I *think* there are panels in the upper back too.

Thirdly, the jacket liner has a really innovative wiring system for the wires that run up the sleeves for the gloves. By rearranging the wires you can wire the gloves to the zone that's controlled by the jacket liner's controller, or you can wire the gloves to the full 12V. The reason for adding the flexibility to the wiring in the jacket liner is that the Sedici gloves have their own integrated controllers for $120. And their construction is really good so far too. BTW, they run a little large. I have carny hands and so I normally wear a small. I picked up a medium pair and they fit terrific.

The versatile multi-zone glove wiring is the rationale behind why the controller for the jacket liner is best mounted inside. It's not necessary, and I've thought about adding some extra length of wire in order to pull the controller out and semi-permanently mounting it with velcro. However, I think I'm willing to put up with the usability issue simply because I plan on moving back and forth between bikes.